Showing posts with label stove top (no oven). Show all posts

Sunday, January 31, 2016

Kırmızı Mercimek Çorbası (red lentil soup)


I love the versatile lentil: the variety, flavor and convenience that these quick cooking pulses offer are all things I approve of. This Turkish soup is my favorite way to prepare red lentils. Velvety smooth like a bisque, I make it with even more vegetables than typically called for. 

We ate this soup frequently in Turkey, watching snow fall outside the window, with chunks of fresh bread and glugs of olive oil. Good times! 

Enjoy this flavorful and elegant soup, made from the humblest of ingredients. 


Kırmızı Mercimek Çorbası (red lentil soup)
  • 1/4 cup of olive oil 
  • 1 onion
  • 1 head of garlic 
  • 3 small carrots 
  • 2 cups orange lentils
  • 4 stalks of celery
  • 12 cups of water
  • 6 ounce can of tomato paste
  • 1 red bell pepper
  • 1 yellow squash or zucchini
  • 1 tablespoon of Aleppo pepper or paprika
  • 1 tablespoon of salt
Chop the garlic and onions. Saute over medium heat in a heavy-bottomed soup pot until the onions are translucent and soft. Add the chopped carrots, celery, bell pepper and water. Cook over medium-low heat for 10 minutes until soft. Now add the lentils, water, tomato paste, paprika and salt. Cook over medium to low heat for 20 to 30 minutes until everything is soft. Turn off the heat and allowed to cool down a few degrees for pureeing in batches in the blender or with your handheld blender (if you have a standing blender, use it, as you will get a smoother texture than with the handheld blender.) Serve with crusty bread and a big green salad.

Saturday, December 5, 2015

irina's borscht


Over the long Thanksgiving weekend, I had the pleasure of spending time with a friend who hails from Russia. When I asked him about delicious vegetarian recipes from his homeland, he mentioned his mother's borscht. He spoke of its richness and the deep color and said that there are two steps that make hers special.

Boiling potatoes to thicken the broth.
One is Zakvaska. To make it, grate 1/3 of the beets going into the soup, saute until very soft and dark with garlic and then add vinegar, bringing out and setting their color. This in turn is added to the soup towards the end of the cooking process and ensures the deep, vivid color of the final soup. The other step is to boil a couple of peeled potatoes into the broth, remove, mash and add back in to the soup. This ensures that the soup will have extra body and thickness.


I helped him make this amazing vegan soup one cold Northern California evening, and then ate as much as I was allowed, and then was sad to see it go. The second time I made this soup I doubled the recipe and not even that lasted very long. This soup makes me feel like I am fortifying my blood.

The lovely Pasha
Borscht is best served hot on a cold day with plain yogurt, sour cream, or with a vegan cashew-lemon-dill sour cream and crusty bread for dipping.


IRINA'S VEGAN BORSCHT

Veggies
3 TBS olive oil
3 small onions, chopped
3 stalks celery, cut into matchsticks 1 inch long
3 large carrots, cut into matchsticks 1 inch long
4 small tomatoes, cut in half (or one can diced tomatoes)
2 lbs red beets, cut into matchsticks 1 inch long

Broth
7 cups vegetable broth (home made, or use bouillon cubes)
2 bay leaves
4 cloves
1/2 teaspoon black pepper
1 lb potatoes, peeled and cut into large chunks
salt

Zakvaska
1 TBS olive oil
1 lb red beets, grated
5 cloves garlic, minced
1/2 cup vinegar (ACV, white, or red)

This is a two pan process.

In a large soup pot, pour a few glugs of olive oil and heat until it begins to shimmer. Add the onions and cook for a few minutes. Then add the carrots and celery and cook for another few minutes until soft and beginning to caramelize. Add the julienned beets and cook until the beets begin to soften.

Meanwhile, in a separate soup pot, put the broth (or water and bouillon cubes), cloves, pepper, bay leaves and potatoes. Simmer until the potatoes are soft and easy to pierce. Remove the potatoes and mash with a fork (or use a ricer like I did), and set aside. Pour the broth into the beets, carrots and celery, and add the diced tomatoes. Cover and simmer for 20 minutes.

Now make the Zakvaska. While the soup is simmering, pour a bit more oil into the second pot and add the shredded beets with the remaining garlic. Cook over medium low heat until the beets are soft and dark in color, about 5--10 minutes. Once done, add the vinegar. Continue to heat and stir for a moment. This creates a delicious element that Pasha and I agree would be great as a stand alone condiment on bread or crackers.

Once the soup has been simmering for 20 or so minutes, add the mashed potatoes along with the shredded beet/vinegar blend. Stir and continue to simmer for another 15-20 minutes. Taste and salt.

Serve hot, with a dollop of yogurt, sour cream or vegan cashew sour cream. I am a lover of fresh herbs, so I felt it necessary to add a sprig or two to mine as garnish.

Finally, please check out these HOT COP oven mitts. Pasha & Ryan are men of high class & taste.


Wednesday, November 4, 2015

vegan mushroom cioppino


Hi, I'm back! I've been cheffing and managing for a vegetarian restaurant these past two years, and my musings have been posted elsewhere on the web. 

Speaking of musings, I am going to keep my future posts short and sweet. I usually scroll right down to the bottom of most food blogs, skipping the novel that precedes the recipe. I find all that writing to be superfluous. In addition, in writing less words, the likelihood of my sharing recipes and other useful information will be greater.

So, without further ado, I would like to share with you the recipe for this vegan mushroom cioppino, a standout soup that was originally created in the late 1800s by Italian fishermen in San Francisco. This version swaps oyster and trumpet mushrooms out for the seafood. I am a big fan of my food processor and used the slicing attachment for the leeks, trumpet mushrooms, garlic, fennel, celery and tomatoes. I suggest you do the same if you have the luxury, its a real time saver.

Omnivores and vegetarians alike go bonkers for this amazing vegan soup, which was in regular rotation at the caffe. Enjoy!

the ingredients

VEGAN MUSHROOM CIOPPINO
Makes about 12 servings (can easily be halved)
  • 1 pound royal trumpet mushrooms, ends removed and sliced into bite sized pieces.
  • 1 pound oyster mushrooms, ends removed and torn into bite sized pieces
  • 1/2 cup olive oil
  • 3 stalks leeks, tough green ends removed, rinsed & thinly sliced (see bottom pic)
  • 18 cloves sliced garlic
  • 2 cups fennel, sliced thin
  • 1 bunch celery, sliced thin
  • 2 cups dry white wine
  • 8 cups water
  • 1 vegetarian bouillon cube
  • 2 1/2 lbs chopped tomatoes
  • 2 teaspoons salt
  • 2 teaspoon white pepper
  • 3 tablespoon Old Bay seasoning
  • 1 teaspoon red pepper flakes
  • Fresh oregano, chopped

In a large stock pot, heat the olive oil until it ripples. Add the leeks, celery and garlic, and brown for 3 to 5 minutes. Add the sliced mushrooms and continue to brown (another 3 to 5 minutes)
Stir in the fennel, then the wine. Let the wine come to a boil, then simmer for 2 minutes.
Add the water and bouillon cube, tomatoes, salt, pepper, chili flakes and Old Bay. Simmer for 30 minutes on low until the mushrooms are tender and the fennel is soft. Remove from heat and add a small handful of chopped fresh oregano. Taste and adjust seasoning.
 

Ladle into bowls. Drizzle with olive oil and serve with sourdough bread

Quick tip for cleaning leeks I learned from David Lebovitz: slice lengthwise up to the root,
making them very easy to rinse off. Then slice as needed.

Thursday, December 6, 2012

poha deluxe


Hi there...how are you? 

Me, I'm great. Have been forgoing the joy of blogging about food and am starting to realize the error in my ways. I eat amazing vegetarian food every single day here in India. One of my 'justifications' is that millions of others do too, and there are about a bajillion Indian vegetarian food blogs out there to satiate the masses. But this is mine, and if for no other reason, I realize that a personal record of my eatings and cookings is in order if for none other than myself.

And you, my dear reader.

What have I been doing with my days? I am here working on a large scale student/community driven mosaic mural at an international school in Northern Mumbai. I spend most of my time (well, I did, but now we are almost finished!) at the school working on the project. Visit my art blog (link is in the side bar) for lots of details and pics. Here is a pic of the almost complete piece:


The rest of my time is spent with friends, new and old. Cooking, eating & drinking. Shopping. Exploring. Visiting nature spots around the city and enjoying the sounds of silence. Which is the best antidote to a city like Mumbai, I have to say.

who's that creepy lurker?

I have bought a couple of cookbooks, and I go to peoples houses and help cook food. I take pictures and jot down recipes. I basically do everything a good food blogger is supposed to do except for the most important thing: blog. So there is a backlog of posts for me to catch up on. But then I think...there are a million recipes for this already on the web so why bother? And then I remember that no two things are the same. And that if I post something I just might turn one or two people onto something awesome that they otherwise might not ever learn.

Enough of my self-justifying rambling. Enter poha. This is another Indian convenience food, normally enjoyed for breakfast. Mumbaikers eat this all the time. For all you cats outside of India, you'll have to take a trip to an Indian market and buy poha, which is precooked, flattened and dry rice. It is a flaky cereal that can easily be reconstituted with a sprinkling of water. It is then seasoned and lightly cooked with a few simple ingredients to create this delicious and quick meal.


left: dry poha.                                                               right: puffed moist poha.

While you are at the Indian market, go ahead and pick up a couple of other awesome staples. For poha you want curry leaves, mustard seed, turmeric, cumin seeds, mustard oil, coconut oil, and green chillis.
And while you are there, just because they are delicious (but not necessary for this recipe) grab some jaggery, black salt, papad, dosa batter, and a block of paneer.

I have been experimenting with all sorts of different oils here, and have landed on a hands-down favorite. I love to cook in a blend of coconut oil and mustard oil. The coconut oil has a lovely flavor, very high smoking point and smooth finish. Mustard oil lends a sharp bite and color to the mix. The combination of these two oils, especially when tempered with mustard and cumin seeds results in a frothy, rich and downright yummy base in which to cook your food. It is ambrosia. 

best flavors in the kitchen: onion, garlic, ginger and hot peppers

Back to poha. I have eaten it multiple times here. Then, I asked people how they made it. Finally, I looked at some recipes on the web. Then I went ahead with my own version. This is what I am offering you now. I call it poha deluxe because I, in true veggie voyager style, always add lots of extra veggies to my recipes. Enjoy!


POHA DELUXE
  • 2 cups thick (not thin) poha, dry
  • water
  • 1 TBS mustard oil
  • 1 TBS coconut oil
  • 1 tsp mustard seeds
  • 1/2 tsp cumin seeds
  • 1 cardamom pod, crushed and skin removed
  • 1 tsp turmeric powder
  • 6 or so curry leaves (if you can't find these, no big deal)
  • 1 tsp red kashmiri chili powder
  • 1 onion, diced
  • 5 cloves garlic, minced
  • 1 thumb fresh ginger, peeled and chopped or grated
  • chopped hot green chillis to taste
  • salt to taste (I like black salt these days)
  • Chopped veggies of your choice. I used 1 large carrot, 1 small sweet potato, 1 tomato, and some small green vegetables whose name evades me. You can use anything you like: zucchini, cauliflower, potato, mushroom, bell peppers, etc.
  • chopped fresh coriander (cilantro)
  • dahi (plain yogurt)

Place the poha in a strainer. Pour distilled water over it to wash and moisten it. Allow to sit for 5 minutes until it is puffy. Sprinkle more water on if necessary. Do not overstir or overmoisten, as you want to keep the shape of the poha. Set aside.

In a skillet over medium-high, heat the mustard and coconut oil. When hot, add the mustard seeds and allow to crackle for a few seconds. Add the cumin seed and sputter for a few more seconds. When the ambrosia smell comes up, add the curry leaves, onion and then the garlic, and ginger. When this is translucent and golden, add the rest of the spices and the chopped veggies. Reduce heat and sauté until the veggies are tender. I like to add the tomatoes in last to retain their fresh, juicy nature.

Now add the moistened, puffed up poha. cook a couple minutes longer, gently stirring to mix while not destroying the poha. If it is too dry seeming, sprinkle a SMALL amount of water and gently mix. Salt to taste. The poha should be golden yellow, speckled with mustard seed and vegetables.

To serve: garnish with a small handful of chopped cilantro and a dollop of fresh yogurt.


Saturday, October 13, 2012

papad with spinach paneer spread


 Hi there! It's been quite a while. My blog presence has shifted to the art world. I am still eating, cooking and traveling and have even felt a twinge of guilt from time to time for neglecting the veggie voyager. Can't promise to post all the time....but I'll try to be better.

In case you're wondering what I've been up to, please take a minute to check out the amazing project I am up to my ears in here in Mumbai, India.

Me (in the middle) with friends and colleagues in Mumbai.

Papad is an Indian snack food that is available all over the place. If you have an Indian market near you, I suggest you go pick up a packet. My friends here tell me that, like ramen in the US, papad is the food that gets college students through those tough nights of studying and drinking. It is not the kind of food that most people here even bother to make from scratch, although I have heard tell that it is sometimes done. But most people just buy papad the way we buy tortillas.

And tortilla like it is. It is a crunchy, flat disc on which one can put any number of toppings, or just eat plain. I have been experimenting with all kinds of different toppings here in my 21st floor apartment. My favorite to date would have to be a spread of yogurt, paneer (Indian cheese, not unlike fresh farmers cheese), garlic and spinach. Kind of a fusion invention, I hope it will appeal to Indian friends as well as everyone else in the world who loves a good quick snack. Consider it fusion food.

papad three ways: grilled paneer & tomatoes, olive oil & tomatoes, spinach paneer spread & tomatoes.

Topped with fresh tomatoes, this can't be beat...

Spinach Paneer Spread
6 cloves garlic
little bit of oil
1 bunch spinach
1 lb paneer (or farmer's cheese)
1/2 cup plain dahi (yogurt)
1 green chili
salt and fresh pepper to taste

Chop the spinach and garlic finely. Sauté the garlic in oil until fragrant and add the spinach to wilt for a minute or so. Put the rest of the ingredients into a food processor or blender and pulse until creamy and spreadable. 

Heat the papad on a dry skillet until it bubbles and becomes crispy. Remove from heat, spread with the spinach paneer spread, top with sliced tomatoes and sprinkle with salt and fresh pepper. Enjoy!

Wednesday, June 13, 2012

fingerling potato salad, turkish style


Today, I had a lovely, relaxing day. I accidentally stumbled into the Goleta farmer's market this morning, on our last day here on this visit. In addition to some stellar stone fruits and strawberries, I picked up a couple pounds of fingerling potatoes, dreaming of a bright, flavorful Turkish style potato salad featuring olive oil, lemon juice and fresh parsley.


Before I started my cooking spree, however, I took another long walk through the butterfly sanctuary up the road, out to a breezy bluff overlooking a clear ocean with oodles of seaweed traipsing through the waves. It was idyllic.


Then, I came back, polished up the mosaic one last time and got cracking in the kitchen. One coconut-strawberry tart and one delicious potato salad later, I sit here and write before we begin the 4 hour journey home.

Enjoy this fresh, bright, tasty salad. It tastes like summer.


fingerling potato salad, turkish style

  • 2-3 lbs fingerling potatoes
  • 1/2 onion, thinly sliced
  • 6 cloves garlic, chopped
  • 1/2 cup parsley, chopped fine
  • 1 large tomato, seeds removed and chopped
  • Juice of one lemon
  • 4 TBS olive oil
  • 2 TBS apple cider vinegar
  • 1 tsp herbes de provence
  • 1 tsp salt
  • fresh black pepper
  • cayenne pepper

Boil the potatoes whole, until al dente, then drain and let cool. Saute the onions and garlic in a pan with a little oil to soften. When the potatoes are cool to the touch, slice in quarters or bite sized pieces. Add the parsley, tomato, garlic, onion to the potatoes in a large bowl. Whisk together the lemon juice, olive oil, vinegar, herbes de provence, salt, black pepper and cayenne pepper and add to the potatoes. Season to taste with more salt and fresh black pepper. Let sit for a while for the flavors to mingle. Serve at room temperature or chilled.

Tuesday, May 15, 2012

lemon rice with beet curry


This is a tasty combination we enjoyed recently, when I had a fridge drawer full of beets and a hankering for an aromatic, flavored rice dish. Remembering that lemons and beets pair nicely, I decided it would be worth a try.

It was, combining complex flavors in a simple recipe. You've gotta love those Indian spices. Paired with tangy yogurt and fresh cilantro, this dish is a no-brainer.

Healthy choices always at the forefront, I used brown basmati, which also loaned a nutty element to the dish. I was inspired by this beet recipe, which adds besan (chickpea flour) to the recipe before serving. This adds nutritional value, flavor and texture to the curry. Yum!


lemon rice
  • 2 cups brown basmati rice
  • 4 cups water
Cook the rice in a rice cooker or on the stove. You want a dry, fluffy rice rather than a sticky rice. Set aside.
  • 1 lemon, zested and juiced
  • 1 tsp mustard seeds
  • 1 tsp black lentils
  • 1-2 hot green chillies (Indian, serrano or jalapeno), minced
  • 1/2 tsp turmeric powder
  • 1/4 tsp asafoetida (if you've got it)
  • 4-5 curry leaves or 1 bay leaf
  • 1 TBS grapeseed oil or other cooking oil
  • salt to taste

In a large wok, heat the oil. Add the mustard seeds and wait for them to begin popping. Then add the chillies, lentils, asafoetida, curry leaves and turmeric. Fry for a minute longer to release the aromatics of the spices, and then add the rice, lemon juice, lemon zest. Stir to combine, salt to taste.

besan-beet curry
  • 6-8 beets, boiled or roasted and then peeled and chopped into bite-sized pieces
  • 1 onion, chopped
  • 1 TBS garlic paste or 4 cloves garlic, minced
  • 1/2 cup besan (chickpea flour)
  • 1 TBS mustard seeds
  • 1 tsp cumin seeds
  • 1-2 hot green chillies (Indian, serrano or jalapeno)
  • 1/2 tsp turmeric
  • salt to taste
  • Oil for cooking
  • Plain yogurt & chopped fresh cilantro (coriander)

In a large wok, heat the oil. Add the mustard and cumin seeds and allow them to brown and begin popping. Add the onion, turmeric and hot peppers. Then add the beets and stir will. Add the besan, sprinkle with a couple of tablespoons water and continue cooking and stirring until the raw flavor of the besan goes away. Salt to taste.

For a groovy dome-shaped service, choose a round bowl of your preferred serving size. Fill the bottom third with beet curry and the rest with lemon rice. Press down firmly, put a small plate on top and flip over. Carefully remove the bowl, and top with plain yogurt and chopped cilantro. Bon appétit!

Sunday, May 6, 2012

playing with idli


One of my first posts on the veggie voyager was for a South Indian staple called idli. I have since mentioned idli multiple times, as it is a traditionally gluten free food that is easy to digest and a tasty vehicle for sauces, chutneys and other delicious dishes (usually Indian, I suppose).

A few months ago I invested in an idli steaming pan from our local Indian grocery store. For a while there I was buying premade idli batter, which is sold in plastic tubs. It is an easy, convenient way to have fresh idli at home, but I was curious about learning to make this dish from scratch.


I have since learned that the process is very easy, as long as you think ahead. All you have to do is soak lentils, rice and fenugreek seeds (separately), blend them (separately), combine, and leave overnight to ferment. The resulting bubbly goodness is a tangy batter that can be spooned into the idli pan and steamed up. Idli are tangy, spongy and delicious.


left to right: rice, quinoa, green lentils & chickpeas;
black rice & brown lentils;
brown rice & urud dahl

The other good news is that this batter, if thinned a little bit with water, can be used to make dosa as well, which you all know is a food I love very much. Dosa are a little more difficult to perfect though, as I especially like mine to be paper thin and dry, and the dosa I've made at home so far are more spongy  than I like. I am working on it though...


the three batters:soaked, blended and ready to ferment.

Because we like to experiment, we decided to try idli using different types of lentils and pulses. Our three experiments were: brown basmati rice and urud dahl (almost a standard, traditional idli), brown basmati and quinoa with green lentils and green chickpeas, and for the third, black rice and dark brown lentils. To the green version we also added spirulina powder and cilantro. The black rice batter got the addition of fresh ginger. After blending, this one morphed into deep purple.

Each was good. The green ones and the white ones won the contest, although we might not add spirulina again. I liked the purple idli but Ryan was not a fan. Our guests really enjoyed the novelty of the different colors and flavors. The traditional, white batter made the best dosa, followed by the green. As dosa, the purple batter was not quite as successful.


I am a firm believer in the wonders of traditional dishes that happen to be gluten free by virtue of their very existence. One does not need to settle for icky, stiff store-bought GF bread or $15 frozen GF pizzas when there are recipes out there that need no xanthan gum or tapioca starch to make them work for you. The fact that these are fermented is an added bonus: fermentation makes food more easily digestible, nutritious and in my humble opinion, better tasting.

If you'd like to experiment, the proportions remain the same, but the types of beans and grains change. All have fenugreek, which is a common Indian spice. Have fun...be wild! If you don't already have one, I hope you will add an idli steamer to your kitchen collection, it's fun to play with...

We invited friends over and enjoyed our idli (and dosa, and rice) with chana masala (chickpeas), baingan bharta (eggplant), aloo gobi (potatoes and cauliflower), mango chutney, cilantro chutney, tamarind chutney, and dahi (Indian yogurt). It was a feast fit for royalty. The chana masala was off the hook. I followed the linked recipe to the tee. I highly recommend that you try it.


Idli

  • 3 cups rice, or combination of rice and quinoa (brown rice, black rice, red rice, etc all should work)
  • 1 cup dahl or lentils (urud dahl is traditional, but depending on color and flavor you can experiment here)
  • 1 tsp fenugreek seeds

Put the rice in one bowl, the dahl and fenugreek seeds in another, cover each with water. Soak overnight or for 6-10 hours. Next day, blend the dahl with a small amount of the soaking water until it is smooth, like shampoo. Transfer to a large bowl. Blend the rice up until it is also quite smooth (but not completely) and add it to the dahl mixture. Stir, cover with a towel and leave to ferment overnight. 

In the morning, the batter should be bubbly and tangy smelling. Stir to combine (it will have separated) and place in the fridge until you are ready to use.

Using a paper towel dipped in oil, lightly oil each idli tray. Fill the compartments, stack the tray and place in a large pot with a lid, with about 1 inch of water in the bottom. Cover and steam for 15-20 minutes, or until the centers of the idli are firmed up. Turn off the heat and allow the idli to sit for 20 minutes or so before using a rubber spatula to scoop each idli out of the tray. Arrange on a plate and serve with sambar, chutney or other sauce.

Wednesday, May 2, 2012

gluten free chia-flax-rice roti


While in India, every time I had a wheat based dish I'd start thinking about how when I got back to San Diego that I'd make a gluten free version of whatever I was eating. I had all kinds of ideas. I still do, so stay tuned for veggie voyager versions of all kinds of stuff.


This is my first contribution to the GF Indian flatbread family, and certainly not the last. I am looking forward to trying some Tibetan steamed bread recipes in the near future.

Chapatti and Roti are unleavened flatbreads traditionally made using whole wheat flour and cooked on a flat skillet called a tava. In some parts of India, hardly a meal is eaten without chapatti or roti.


We are staying with dear family/friends in Goleta, CA, just north of Santa Barbara. We are here to visit, to see Steve Martin play his banjo, plan another mosaic project, and eat good, healthy food.

of course, being californian, some of us did it taco style...

When I planned to make this meal, I didn't even realize that I was making a GF version of Camel Safari Masala, until Ryan pointed it out to me. I made a masala with brussels sprouts, black eyed peas, and cauliflower florets. It was tasty alongside cilantro chutney, raw mango chutney and fresh plain yogurt.

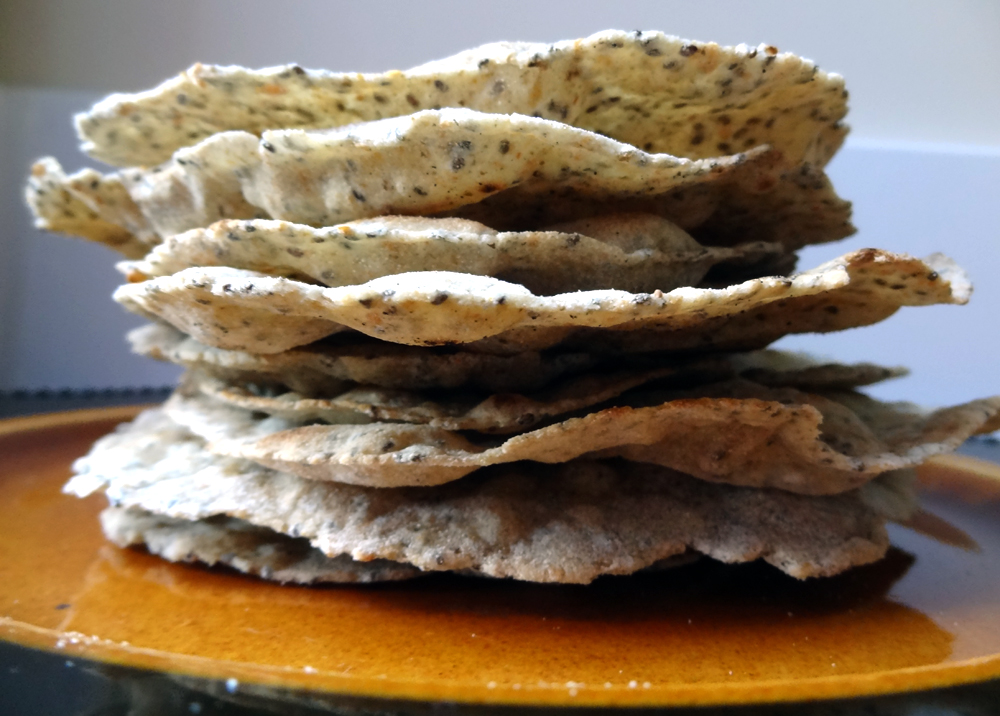
These flatbreads are a slightly pliable but not quite as soft as wheat based chapatti or roti (which are basically the same thing). The rice flour results in a slightly drier, crispier bread that is less heavy than its wheat-based relative. They are speckled throughout with chia seeds. They are perfect for conveying morsels of the masala over to the mouth region. I did not use a recipe per-say, but I will walk you through the process so you can enjoy them at home.


GF Chia-Flax-Rice Roti

  • 2 TBS chia seeds
  • 1/2 cup flax meal
  • 2 TBS oil of your choice (I used olive)
  • 2-3 cups rice flour (I like brown rice flour)
  • 1 tsp salt
  • 1/4 cup of water or so

Combine the chia seeds, flax meal, oil, salt and water. Add one cup of rice flour and mix. Continue mixing and adding rice flour a little bit at a time until the dough forms a ball. Knead the dough as you would a wheat dough, adding small amounts of rice flour to prevent it from getting sticky. When the dough is elastic and smooth, create a log that is about 1 1/2 inches in diameter and 1 foot long. Cut this log into sections that are about 1 inch wide. Using your fingers, press each section into a flattened disk. Dust each side with rice flour and roll out using a rolling pin on a flour dusted surface until you have a thin, round sheet, not unlike a tortilla. Heat a skillet and rub with a small amount of oil. In India, they take a half potato or onion, stab it with a fork, dip the flat side into oil and use that to oil the pan. You don't need much oil if any at all for this, just an initial amount to help start the process. When the pan is hot, add one roti and cook until it begins to blister. Flip and continue cooking until it is cooked to your liking. Set aside and continue with the rest until you have a delicious stack of crispy roti. Enjoy with masala, curry or chutney.
ready for rolling out.

Thursday, April 19, 2012

Zucchini 'Pasta' with Mushroom-balls


I know you regular readers were expecting an all green recipe (I did say maybe). Sorry, you'll have to wait. And I would hardly classify these mushroom-balls as "cleansing", but this meal is fresh, light and filling. I haven't quite gotten rolling on any official cleanse yet. I'm still working on that one...it might happen. For now, enjoy this lovely and partially cleansing meal.

If you omit the mushroom-balls, (I admit that this name is not-too-appealing, but neither is the word "meat-ball", if you ask me), you've got a very healthful meal that is reminiscent of real pasta with none of the gummy, difficult to digest starches found in conventional pasta. And if you don't omit the mushroom balls, you're in for a real taste treat as they a perfect compliment to this meal. I have made this twice in the last week trying to perfect the mushroom-ball recipe. Each version was delicious, and different from the other.

making the mushroom-balls

As far as I know, the idea for zucchini noodles stems from raw food cuisine. There are multiple ways to turn a vegetable into noodle-y shapes. The easiest way, and one that requires no special tool beyond a vegetable peeler, is to shave fettuccine-like strips from the zucchini until you have a pile of shavings. I like to use a mandoline, which is an amazing slicing and dicing contraption used by Japanese chefs and others in-the-know. If you really want to get proprietary, then you can go for a spiralizer or other doodad specifically designed for making noodles and twirly strips from various vegetables. I have one that makes angel-hair like shreds, but I don't have the kind that makes big, fat twirly udon-like noodles. I want one but am trying to curb my slightly ridiculous collection of single-purpose kitchen toys. If you are patient, you could just julienne the zucchini with your chef's knife and no one would be the wiser.

making the "pasta"

What makes these noodles taste a little better than their raw cousins is a sweating and softening with a little salt and freshly ground black pepper in a wok or other large pan. The idea is not to fully cook them, but to let them drop their raw crunch and flavor ever so slightly. You need no oil for this step and it takes just a few minutes. The difference is palpable, if you ask me. I got pretty burned out on the raw zuchinni pasta after a while but I could eat these on a regular basis. They are tender and juicy and an ideal vehicle for fresh tomato sauce.
Zucchini 'Pasta' with Mushroom-balls
mushroom-balls
  • 1/2 onion, chopped coarsley
  • 4 cloves garlic
  • 1/2 head parsley
  • 1/2 cup walnuts
  • 6 cups crimini mushrooms (or your favorite variety)
  • 1 egg
  • 1 cup flax meal
  • 1 cup lentil, chickpea or other GF flour (I like bean flour for this for nutritional reasons)
  • 1 TBS Italian Seasonings (combo of basil, oregano, marjoram, etc)
  • 1/2 cup nutritional yeast
  • large pinches of salt, black pepper & cayenne pepper
  • Oil for sauté or frying (sunflower or grape seed for sauté, grape seed or rice bran oil for deep fry)
 In a food processor, combine the onion, garlic, parsley, mushrooms, and nuts until they are chopped finely but not completely pulverized. Transfer into a mixing bowl and add the rest of the ingredients. Mix well by hand. It should resemble uncooked...meatloaf or meatballs. If it is still too soft, add more bean flour until you can scoop up a bit and shape it into a ball. The first time I made these there was more flour, and I was able to roll them in my hands into balls before I put them into the pan. The second time, I used a small ice cream scoop to drop the balls directly into the oil. It reminded me of making falafel.

eerily similar to ground meat...thankfully it is not

To cook, either put a small amount of oil in a heavy skillet to brown on each side, or do the naughty thing (like I did) and fill a small saucepan with a couple of inches of frying oil (like rice bran oil) and deep fry the suckers (this is where I veered drastically from any semblance of a cleanse). Both methods work just fine, although (surprise) the deep frying was a little bit tastier. I did not try baking these, but if you do...let me know how it worked out. In my raw food days I would have dehydrated the lot, but I wouldn't have added egg, or lentil flour. What you are looking for is a firmed up ball that is golden brown.
 

If you can somehow have your sauce simmering at the same time as you are frying the mushroom-balls, then you must be a pro. I needed a helper in the kitchen to keep this meal under control.
fresh tomato sauce
  • 1/2 onion, chopped finely (the other half)
  • 6 cloves garlic, minced
  • 6 large ripe tomatoes, pulsed in a food processor  or blender until they are chunky but slightly puréed.
  • small amount of oil
  • 1 tsp each of salt, sugar, red pepper flakes, dried basil, dried oregano, and balsalmic vinegar (or red wine if you've got one open)
  • small handfulls of Fresh herbs: basil, parsely, oregano, etc
Sauté the onions and garlic in a small amount of oil. Add the tomatoes, salt, sugar, peppers, basil, dried herbs and vinegar or wine. Allow to simmer for about 10 minutes. Taste and adjust the seasoning. After you remove the sauce from the flame, add the fresh chopped herbs and set aside.

'pasta'
  • 4 large, straight zucchini (or 2 per person)
  • salt & freshly ground pepper
Using one of the methods previously described, turn your zucchini into noodles.Toss the lot into a wok, sprinkle with salt and pepper, and sweat the crunchy raw qualities out, tossing the noodles about in the pan over a medium heat for about 3 minutes, or to your taste.

sweating the zucchini
plating
Arrange a small amount of  "pasta" on a bowl or plate. Top with a few mushroom-balls and a generous dollop of sauce. I like to sprinkle a combination of nutritional yeast, salt, garlic powder, hemp seeds and herbs (like a vegan-hippy parmesan cheese) over mine. Shaved Parmesan or Asiago is also devine...

Tuesday, April 17, 2012

Carrot Ginger Bisque
With Parsley Chutney
and To Cleanse or Not to Cleanse?


When we were in India, Ryan and I came up with a plan to do a juice feast or some other cleansing diet when we returned to help reset our systems and flush out any...tennants. We discussed even doing The Master Cleanse for a couple of days to really get things sorted out in there. It sounded like a good idea, especially with our bellies full of glutenous chapattis and sugary chai.

lassi: full of friendly probiotics

On returning, Ryan did some homework and decided that the Master Cleanse was the way to go...all the way...which is 10 days minimum of lemon juice, maple syrup and cayenne pepper. To top it all off, he purchased Sonne's 7 day colon cleanse, something that has been around for decades and that guarantees to excommunicate a nasty looking black tube of gunk from your intestinal tract. This cleanse also requires seven days of fasting, eating nothing at all except for spoonfuls of a clay concoction and some supplements.

making lemon juice for the master cleanse...

I have done my fair share of cleansing diets and fasts. While not fun per say, the tingly feeling you get when you know you are detoxifying your system is a sensation worth its weight in gold. Juice Feasting has been a personal favorite for me, giving the digestive system a needed break while infusing the body with valuable nutrients at the same time. The main drawback to Juice Feasting is that you really start to miss chewing. Master Cleanse didn't pan out for me but that is probably because I did it with honey (against all advice) instead of maple syrup. We ate raw food exclusively for over a year and that had its own healing properties as well as some negative side effects.


juice stand in delhi

Now that I have the veggie voyager, I am only more obsessed with food in all its veggie forms than ever before. When I think about not eating for 10 days I am overcome with a feeling of distaste and dread. On one hand, it would certainly be healthy (both mentally and physically) for me to step away from this intense love affair for a few days. On the other hand, I am not sure that I have the emotional capacity to do so. Of course, anything is possible, but I just don't want to. Ryan is now on his fourth day of the Master Cleanse. Usually we are in solidarity in these types of things...just not this time.


However, I would like to do something cleansing that still ignites my creative fires and satisfies my yearning for good food on a daily basis. I have been researching yogi cleanses and I have found one in the kundalini branch of yoga that seems cleansing, creative, tasty and fun. It is called the Green Cleanse and basically for 40 days you eat only food that is green. This includes vegetables, fruit, and some other green things including pepitas, mung beans, green lentils, nori, green olives and olive oil. Sorry, I don't think that green jolly ranchers, green jelly bellies, green beer, or other such items are on the menu. I did go to the market and stocked up on kale, chard, spinach, lettuce, cucumbers, tomatillo salsa, parsley, broccoli, leeks, green onions, avocados, green apples, and zucchini. I noticed other green foods as well, including brussels sprouts, green beans, chayote, asparagus, sprouts and honeydew melons. I think it would be fun to create recipes from only green things, at least for a week or so. And the pictures would be fun too. But for 40 days? Maybe I'll do an abbreviated version. Maybe I'll love it so much that I'll keep going. What do you think about this idea? I would love your input or suggestions on this one. If you can't tell, I am crippled with indecision here.


While I do practice yoga, I am not a kundalini yogi...nor do I plan to become one. But I don't think there is anything wrong with embarking on a cleansing diet designed to "alkalize the body, lose weight, clear the skin and cleanse the liver. It is also useful in relieving a toxic mucous condition."

Another cleansing fast I came across was the mung bean, rice, and yogurt cleanse, a nutritious, healing yogi diet that can be followed for years and years if desired. I noticed that many of the spices and additions to yogic cleanses included the full spectrum of Indian spices (toted as purifying and healing), lentils, rice, fresh yogurt, and basically, most of the foods I enjoyed while in India. In retrospect, the Indian diet really agreed with my system. Even though I was eating wheat the whole time, I had stellar digestion, clear skin and even lost a few pounds while there. Considering the amount of eating I was doing, this is all amazing news. I believe that there really is something magical about the Indian vegetarian diet.


idli: easy to digest fermented rice and bean cakes

the same goes for dosa.

And then, my friend Shelly did this cleanse she saw on the blog coconut and quinoa, and she loved it. She said that she felt clean and energetic afterwards, and that it wasn't too difficult to stay on the cleanse. So many decisions! This one looks very doable and quite easy as it is only 5 days long. It involves broth, salad, lemon juice, and herbal tea.

I realize that this is a lot of writing to precede a recipe that isn't even part of this green cleanse (or any cleanse for that matter), which I haven't even decided if I want to do or not. I might, probably. Or I just might lighten up my diet for a few weeks, concentrate on eating fruits and vegetables and cut back on the baking and other starches. Some kind of hybrid of a raw food regimen, slow-carb, vegetarian and gluten free, using ideas culled from several different food philosophies I've picked up along the way. And I probably won't stop eating rice, as it seems to really agree with my system.

ting momo: delicious but full of sticky gluten

Without further ado, here is a recipe for a soup I made recently. Nothing too original, but very tasty, pretty light, and a start to the cleansing food habit I am embarking on. Set next to Ryan's Master Cleanse it seems rather decadent, but in the full spectrum of possibilities, healthful and easy to digest. The carrots and cashews blend into a velvety purée, and the zesty chutney provides a garlicky tang that completes the dish marvelously. Maybe next time I'll post an all-green recipe.


Carrot Ginger Bisque with Parsley Chutney


soup
  • 1 onion, chopped
  • 1/2 head garlic (6 cloves or so), chopped
  • 1 1/2 inches fresh ginger
  • Oil to Sauté
  • 1 1/2 lbs carrots (about 5 carrots), chopped into chunks
  • 1/2 TBS herbes de provence
  • 1/2 cup cashews (optional)
  • Salt to taste
  • Red pepper flakes to taste
  • 4 cups water
Sauté the onions and garlic, add rest of ingredients and simmer until the carrots are tender. Remove from heat. Using a standup or immersion blender, purée the soup until it is thick, smooth and velvety. 


chutney
  • 1 clove garlic
  • Juice of 1 regular sized lemon or 2 small lemons
  • Drizzle of olive oil
  • 1 jalapeno
  • 1 bunch of fresh parsley
  • Pinch of salt
  • Small amount of water to help with the blending
Put all ingredients except water into the blender, and blend. If needed, drizzle a little more water in to get things going. 


to serve
Ladle soup into bowls. Finish with a drizzle of olive oil, a spoonful of chutney and a sprinkling of black pepper. If you are not trying to be too good, a pat of butter stirred in before you add the chutney is quite nice. 
Bon appetit!