Showing posts with label vegan. Show all posts

Sunday, January 31, 2016

Kırmızı Mercimek Çorbası (red lentil soup)


I love the versatile lentil: the variety, flavor and convenience that these quick cooking pulses offer are all things I approve of. This Turkish soup is my favorite way to prepare red lentils. Velvety smooth like a bisque, I make it with even more vegetables than typically called for. 

We ate this soup frequently in Turkey, watching snow fall outside the window, with chunks of fresh bread and glugs of olive oil. Good times! 

Enjoy this flavorful and elegant soup, made from the humblest of ingredients. 


Kırmızı Mercimek Çorbası (red lentil soup)
  • 1/4 cup of olive oil 
  • 1 onion
  • 1 head of garlic 
  • 3 small carrots 
  • 2 cups orange lentils
  • 4 stalks of celery
  • 12 cups of water
  • 6 ounce can of tomato paste
  • 1 red bell pepper
  • 1 yellow squash or zucchini
  • 1 tablespoon of Aleppo pepper or paprika
  • 1 tablespoon of salt
Chop the garlic and onions. Saute over medium heat in a heavy-bottomed soup pot until the onions are translucent and soft. Add the chopped carrots, celery, bell pepper and water. Cook over medium-low heat for 10 minutes until soft. Now add the lentils, water, tomato paste, paprika and salt. Cook over medium to low heat for 20 to 30 minutes until everything is soft. Turn off the heat and allowed to cool down a few degrees for pureeing in batches in the blender or with your handheld blender (if you have a standing blender, use it, as you will get a smoother texture than with the handheld blender.) Serve with crusty bread and a big green salad.

Tuesday, January 5, 2016

white beans with grilled kale and roasted tomatoes


Happy New Year!

A while back, I posted about a kale recipe that I cannot get enough of. Well, here is a great way to incorporate it into an amazing recipe that is loaded with flavor. This recipe takes some time, but is worth it and you should have leftovers. We enjoyed it on New Years, as a good luck dish (legumes & greens = CASH MONEY). I also served it at my December pop-up dinner and it was a huge hit with everyone. Worth it!


Yet another win for vegan deliciousness! Enjoy.

the ingredients

WHITE BEANS WITH GRILLED KALE & ROASTED TOMATOES

4 cups dry cannelini beans, soaked overnight
2 bay leaves
2 pounds kumato, cherry or grape tomatoes, washed and cut in half
2 pounds kale, grilled
2 purple onions, thinly sliced
1 head garlic, peeled and sliced
3 TBS olive oil
salt & black pepper
zest and juice of one lemon

In a large pot or crockpot, cook the beans over low heat in ample amounts of water with the two bay leaves until quite soft, approximately 2-3 hours.

Meanwhile...

Grill the kale using this technique

Roast the tomatoes. Preheat the oven to 350F. Line a baking sheet with parchment paper, arrange the tomatoes in one layer, drizzle with olive oil and sprinkle with salt & black pepper. Roast for about one hour, until the tomatoes are shriveled and reduced in size. This technique is great for bringing out natural sweetness and flavor in even a mediocre tomato. When done, remove from oven and set aside..


Using a knife, slice the stems from the kale and set aside the leaves. Slice up the stems into small pieces. In a heavy bottomed skillet, saute the onions over low heat in the olive oil until they begin to soften, about 10 minutes. Add the garlic and kale stems and continue to cook until all is soft and caramelized.

Slice the grilled kale leaves. It is now time to assemble the beans.

Strain the beans and discard the water, or save to make aquafaba.

In a heavy bottomed skillet, combine the beans, kale, caramelized onion, garlic and kale stems. Stir to combine and warm over medium to low heat. Add lemon zest & juice. Taste and adjust salt. Add cayenne pepper if you like spicy. Add the tomatoes and gently stir in. This should be bursting with umami and flavor.

Enjoy with bread, rice, in a tortilla or all on its own.

xxoo
Kirstin

Saturday, December 5, 2015

irina's borscht


Over the long Thanksgiving weekend, I had the pleasure of spending time with a friend who hails from Russia. When I asked him about delicious vegetarian recipes from his homeland, he mentioned his mother's borscht. He spoke of its richness and the deep color and said that there are two steps that make hers special.

Boiling potatoes to thicken the broth.
One is Zakvaska. To make it, grate 1/3 of the beets going into the soup, saute until very soft and dark with garlic and then add vinegar, bringing out and setting their color. This in turn is added to the soup towards the end of the cooking process and ensures the deep, vivid color of the final soup. The other step is to boil a couple of peeled potatoes into the broth, remove, mash and add back in to the soup. This ensures that the soup will have extra body and thickness.


I helped him make this amazing vegan soup one cold Northern California evening, and then ate as much as I was allowed, and then was sad to see it go. The second time I made this soup I doubled the recipe and not even that lasted very long. This soup makes me feel like I am fortifying my blood.

The lovely Pasha
Borscht is best served hot on a cold day with plain yogurt, sour cream, or with a vegan cashew-lemon-dill sour cream and crusty bread for dipping.


IRINA'S VEGAN BORSCHT

Veggies
3 TBS olive oil
3 small onions, chopped
3 stalks celery, cut into matchsticks 1 inch long
3 large carrots, cut into matchsticks 1 inch long
4 small tomatoes, cut in half (or one can diced tomatoes)
2 lbs red beets, cut into matchsticks 1 inch long

Broth
7 cups vegetable broth (home made, or use bouillon cubes)
2 bay leaves
4 cloves
1/2 teaspoon black pepper
1 lb potatoes, peeled and cut into large chunks
salt

Zakvaska
1 TBS olive oil
1 lb red beets, grated
5 cloves garlic, minced
1/2 cup vinegar (ACV, white, or red)

This is a two pan process.

In a large soup pot, pour a few glugs of olive oil and heat until it begins to shimmer. Add the onions and cook for a few minutes. Then add the carrots and celery and cook for another few minutes until soft and beginning to caramelize. Add the julienned beets and cook until the beets begin to soften.

Meanwhile, in a separate soup pot, put the broth (or water and bouillon cubes), cloves, pepper, bay leaves and potatoes. Simmer until the potatoes are soft and easy to pierce. Remove the potatoes and mash with a fork (or use a ricer like I did), and set aside. Pour the broth into the beets, carrots and celery, and add the diced tomatoes. Cover and simmer for 20 minutes.

Now make the Zakvaska. While the soup is simmering, pour a bit more oil into the second pot and add the shredded beets with the remaining garlic. Cook over medium low heat until the beets are soft and dark in color, about 5--10 minutes. Once done, add the vinegar. Continue to heat and stir for a moment. This creates a delicious element that Pasha and I agree would be great as a stand alone condiment on bread or crackers.

Once the soup has been simmering for 20 or so minutes, add the mashed potatoes along with the shredded beet/vinegar blend. Stir and continue to simmer for another 15-20 minutes. Taste and salt.

Serve hot, with a dollop of yogurt, sour cream or vegan cashew sour cream. I am a lover of fresh herbs, so I felt it necessary to add a sprig or two to mine as garnish.

Finally, please check out these HOT COP oven mitts. Pasha & Ryan are men of high class & taste.


Monday, November 23, 2015

game changing grilled kale


I cannot stress enough how much I love this stuff.  Dress it up or eat it straight off the stems with your hands, oil dripping down your chin. I don't really want to eat kale any other way these days. This recipe's chewy, smoky, juiciness satisfies me at a very primal level.


Plan on one bunch of kale per person. You'll want to fire up your barbecue for this one.

GAME CHANGING GRILLED KALE

1 bunch of kale (curly is awesome but any will work)
3 cloves garlic
1/4 cup oil (avocado, sunflower, olive are my faves)
1 tsp salt
1/2 tsp black pepper
1 lemon

Wash, drain and place the kale in a large bowl. In a blender, blend the garlic, oil, pepper and salt together. Pour over the kale and toss to coat.

Over low heat, place the kale leaves on the grill. Cook for a couple of minutes and flip, and cook for a couple of more minutes on the other side, until the leaves are soft and edges starting to char just a little bit. Don't over-grill, as the burnt ones aren't as awesome to eat.

Remove from the grill. Squeeze lemon juice over leaves and go to town.


Another way to serve is to chop the leaves off the stems and make a salad.
This one is quite amazing.


Thursday, November 12, 2015

kelewele bites

photo by kelly bone

My current assignment is to come up with creative and attractive African inspired appetizers for an event. The first thing that came to mind was kelewele (pronounced kelly-welly), a dish that I know and love from years living in Ghana, West Africa.

West African plantains are the best I've ever had. They're spiked with ginger, garlic, hot pepper and salt. In Ghana they're deep fried but I like to coat and roast. If you cut them into skinny little discs and stack them up on a toothpick they are transformed from humble nighttime street snack to high class cocktail party item.

KELEWELE
  • 3 lbs ripe sweet plantains (skin black if possible) sliced into 1/8"-1/4" rounds
  • 1/4 cup avocado oil (or other oil)
  • 4 ounces fresh ginger
  • 3 ounces fresh garlic
  • 1-2 habanero peppers
  • 1/2 tsp salt
Preheat the oven to 375F. Place the plantains in a mixing bowl. In a blender, combine oil, ginger, garlic, peppers and salt. Blend until smooth, and then pour over the plantains, stirring to coat well. Allow to marinate for at least 30 minutes.

Spread plantains on a parchment lined baking sheet (or two) in an even layer. Roast for about 20 minutes, until edges begin to caramelize. Using a spatula, flip them and continue to roast until they are golden brown and caramelized. Stir once or twice during the process to prevent the outer pieces from burning. 

Once cooked, remove from oven. These are best hot but still taste good even as they cool down. If you are serving them as an appetizer, spike three to a toothpick and arrange on a plate with a dusting of sea salt, garlic chives and aleppo pepper.

Wednesday, November 4, 2015

vegan mushroom cioppino


Hi, I'm back! I've been cheffing and managing for a vegetarian restaurant these past two years, and my musings have been posted elsewhere on the web. 

Speaking of musings, I am going to keep my future posts short and sweet. I usually scroll right down to the bottom of most food blogs, skipping the novel that precedes the recipe. I find all that writing to be superfluous. In addition, in writing less words, the likelihood of my sharing recipes and other useful information will be greater.

So, without further ado, I would like to share with you the recipe for this vegan mushroom cioppino, a standout soup that was originally created in the late 1800s by Italian fishermen in San Francisco. This version swaps oyster and trumpet mushrooms out for the seafood. I am a big fan of my food processor and used the slicing attachment for the leeks, trumpet mushrooms, garlic, fennel, celery and tomatoes. I suggest you do the same if you have the luxury, its a real time saver.

Omnivores and vegetarians alike go bonkers for this amazing vegan soup, which was in regular rotation at the caffe. Enjoy!

the ingredients

VEGAN MUSHROOM CIOPPINO
Makes about 12 servings (can easily be halved)
  • 1 pound royal trumpet mushrooms, ends removed and sliced into bite sized pieces.
  • 1 pound oyster mushrooms, ends removed and torn into bite sized pieces
  • 1/2 cup olive oil
  • 3 stalks leeks, tough green ends removed, rinsed & thinly sliced (see bottom pic)
  • 18 cloves sliced garlic
  • 2 cups fennel, sliced thin
  • 1 bunch celery, sliced thin
  • 2 cups dry white wine
  • 8 cups water
  • 1 vegetarian bouillon cube
  • 2 1/2 lbs chopped tomatoes
  • 2 teaspoons salt
  • 2 teaspoon white pepper
  • 3 tablespoon Old Bay seasoning
  • 1 teaspoon red pepper flakes
  • Fresh oregano, chopped

In a large stock pot, heat the olive oil until it ripples. Add the leeks, celery and garlic, and brown for 3 to 5 minutes. Add the sliced mushrooms and continue to brown (another 3 to 5 minutes)
Stir in the fennel, then the wine. Let the wine come to a boil, then simmer for 2 minutes.
Add the water and bouillon cube, tomatoes, salt, pepper, chili flakes and Old Bay. Simmer for 30 minutes on low until the mushrooms are tender and the fennel is soft. Remove from heat and add a small handful of chopped fresh oregano. Taste and adjust seasoning.
 

Ladle into bowls. Drizzle with olive oil and serve with sourdough bread

Quick tip for cleaning leeks I learned from David Lebovitz: slice lengthwise up to the root,
making them very easy to rinse off. Then slice as needed.

Sunday, October 13, 2013

karelian pies: vegan, two ways


Unless you are Finnish, you are probably asking, "what is a Karelian Pie?" I never knew until I went there and had them for breakfast multiple times. Eaten warm, and slathered with not-so-vegan egg butter, these savory rye and rice pastries are so good. In Finland, I saw them in one format: plain. Which is absolutely delicious and when I make them now, I do half plain and half in some other flavor. Because I am not Finnish, I guess it's ok for me to riff on the original. If you are a Finnish investor and would like me to come and live in Helsinki, and run a Karelian pie bakery that isn't afraid to take these classics to a new level, please contact me and we can talk.


I have broken from tradition here in two ways. In Finland, Karelian Pies are filled with a porridge of milk, salt and short grain rice. The first time I made these, I made two different kinds, one with cow's milk and one batch with coconut milk. I am not sure why, but it was virtually impossible to tell which one was which. This is good news for vegans and people avoiding dairy. The other liberty I took was to stir boiled, pureed carrots and a bit of oil tempered with cumin seeds in to half of the finished rice porridge before stuffing the pastries. This resulted in a creamy, slightly sweet cumin laced pie, which I have to say I like even more than the original. One thing I have learned about Karelian Pies: the flavor must be simple and pure so as not to overpower the subtle flavor of the rye flour crust. 


A word on rye, gluten and other ancient grains. I have been floating on a sea of information and observation for years now, trying to decipher and filter out what works for me in regards to what I eat, and how it makes me feel, both psychologically and physiologically. The island I have landed on in recent months is one that I like, and think I will stay here for a while. I do not have celiac disease. And I may or may not have a sensitivity to gluten, as I sometimes notice if I eat too much wheat, or believe what my allergy blood test tells me. But I often wonder if it is not just the super-sized wheat mutant monster that scientists have created to satiate America's gluten addiction that some of us are reacting to? Perhaps the more delicate, sensitive gluten found in ancient, unadulterated grains such as rye, spelt, kamut and barley are more digestible? I am no scientist, and I am not going to cross-reference my readings here. But this is where I am at, and I have been baking a lot using these wheat alternatives, which have gluten, but my body seems to know what to do with. I was so healthy and happy in Finland, as if my system was finally in its nutritional homeland. Don't even get me started on the bread there. The rye bread alone was worth the trip.

Back to Karelian Pies. This is a food you are unlikely to see outside of Finland very often. Luckily, they freeze well, and hold together well enough to pop into the toaster or toaster oven for a quick breakfast. Although whenever we make them here, they don't make it to the freezer at all. 


Karelian Pies are typically eaten with egg butter (I love egg butter). It is basically hard boiled eggs mashed up with room temperature butter, and this is the part of the puzzle that I haven't tackled for the vegans, as I do eat eggs. If you eat eggs but not dairy, like my man, you can make the egg butter with coconut oil and it is just as good as the one made with butter.

This is one of those cooking projects, like tamales, that is more fun done with friends and wine and when you have time to cook. Make lots, share with everyone, eat a bunch, and hopefully you'll even have enough left over to freeze.

If you are inspired to make some other flavor, please share...these things are ripe for experimentation!

Here is a good recipe for traditional Karelian Pies, and the one that I adapted from.


Vegan Karelian Pies 
(makes 40 pies)
600ml water
3 14oz cans coconut milk (minus 1/4 cup)
2 cans water
370 g abborio or other short grain rice
1 tsp salt

(for carrot version)
6 large carrots, peeled & chopped
2 Tablespoons coconut oil
2 teaspoons cumin seeds

600ml water
600-700 g rye flour
pinch of salt

50g coconut oil
1/4 cup of coconut milk
600 ml water
3-4 hard-boiled eggs, peeled and cooled
100g soft butter or coconut oil
Make the porridge. Boil the water in a large pan. Add the rice and cook for a couple of minutes, then add the coconut milk and bring to a soft boil. Simmer for about 45 minutes to an hour, until it is a thick, creamy porridge. Add salt and let cool completely.

Make the carrot-cumin element. Steam or boil carrots until soft. Puree in blender. In a small pan, heat the coconut oil until it spatters when you drop a single cumin seed in there. Once ready, temper the oil with the remaining cumin seeds, allowing them to pop, toast and spatter for about 15 seconds. Remove from heat, stir into the carrot mixture. Divide the rice porridge in half, and add the carrot cumin mixture. You will now have two flavors of Karelian Pie!

Make the rye dough. Combine water, salt and 500 grams rye flour in a bowl. Continue to add flour until the dough can be kneaded and handled. Cut the dough into quarters, and then roll each quarter into a cylinder.  Divide each cylinder of dough into ten equal portions and flatten each portion to make a round disk. Cover the disks with cling wrap to avoid drying. 


Make the pies. Roll one disk at a time into a thin (2-3mm thick) oval, spread couple of tablespoons of porridge onto the disk, and wet the edges of the disk with water using your finger. Pinch the sides together around the disk, creating a little basket using your thumb and index finger. 

Bake the pies. Place the pies on baking trays lined with parchment paper and bake in a preheated oven (425F) for 15-20 minutes or until the tops are slightly browned.

Heat coconut oil, coconut milk and water in a saucepan. Dip each pie in the hot mixture to soften. Place on drying rack for 5-10 minutes so the milk does not make the bottoms soggy. 


Use a fork to mix the eggs with soft butter and serve the pies topped with this mixture. These pies can be frozen (minus the egg butter).

Thursday, December 6, 2012

poha deluxe


Hi there...how are you? 

Me, I'm great. Have been forgoing the joy of blogging about food and am starting to realize the error in my ways. I eat amazing vegetarian food every single day here in India. One of my 'justifications' is that millions of others do too, and there are about a bajillion Indian vegetarian food blogs out there to satiate the masses. But this is mine, and if for no other reason, I realize that a personal record of my eatings and cookings is in order if for none other than myself.

And you, my dear reader.

What have I been doing with my days? I am here working on a large scale student/community driven mosaic mural at an international school in Northern Mumbai. I spend most of my time (well, I did, but now we are almost finished!) at the school working on the project. Visit my art blog (link is in the side bar) for lots of details and pics. Here is a pic of the almost complete piece:


The rest of my time is spent with friends, new and old. Cooking, eating & drinking. Shopping. Exploring. Visiting nature spots around the city and enjoying the sounds of silence. Which is the best antidote to a city like Mumbai, I have to say.

who's that creepy lurker?

I have bought a couple of cookbooks, and I go to peoples houses and help cook food. I take pictures and jot down recipes. I basically do everything a good food blogger is supposed to do except for the most important thing: blog. So there is a backlog of posts for me to catch up on. But then I think...there are a million recipes for this already on the web so why bother? And then I remember that no two things are the same. And that if I post something I just might turn one or two people onto something awesome that they otherwise might not ever learn.

Enough of my self-justifying rambling. Enter poha. This is another Indian convenience food, normally enjoyed for breakfast. Mumbaikers eat this all the time. For all you cats outside of India, you'll have to take a trip to an Indian market and buy poha, which is precooked, flattened and dry rice. It is a flaky cereal that can easily be reconstituted with a sprinkling of water. It is then seasoned and lightly cooked with a few simple ingredients to create this delicious and quick meal.


left: dry poha.                                                               right: puffed moist poha.

While you are at the Indian market, go ahead and pick up a couple of other awesome staples. For poha you want curry leaves, mustard seed, turmeric, cumin seeds, mustard oil, coconut oil, and green chillis.
And while you are there, just because they are delicious (but not necessary for this recipe) grab some jaggery, black salt, papad, dosa batter, and a block of paneer.

I have been experimenting with all sorts of different oils here, and have landed on a hands-down favorite. I love to cook in a blend of coconut oil and mustard oil. The coconut oil has a lovely flavor, very high smoking point and smooth finish. Mustard oil lends a sharp bite and color to the mix. The combination of these two oils, especially when tempered with mustard and cumin seeds results in a frothy, rich and downright yummy base in which to cook your food. It is ambrosia. 

best flavors in the kitchen: onion, garlic, ginger and hot peppers

Back to poha. I have eaten it multiple times here. Then, I asked people how they made it. Finally, I looked at some recipes on the web. Then I went ahead with my own version. This is what I am offering you now. I call it poha deluxe because I, in true veggie voyager style, always add lots of extra veggies to my recipes. Enjoy!


POHA DELUXE
  • 2 cups thick (not thin) poha, dry
  • water
  • 1 TBS mustard oil
  • 1 TBS coconut oil
  • 1 tsp mustard seeds
  • 1/2 tsp cumin seeds
  • 1 cardamom pod, crushed and skin removed
  • 1 tsp turmeric powder
  • 6 or so curry leaves (if you can't find these, no big deal)
  • 1 tsp red kashmiri chili powder
  • 1 onion, diced
  • 5 cloves garlic, minced
  • 1 thumb fresh ginger, peeled and chopped or grated
  • chopped hot green chillis to taste
  • salt to taste (I like black salt these days)
  • Chopped veggies of your choice. I used 1 large carrot, 1 small sweet potato, 1 tomato, and some small green vegetables whose name evades me. You can use anything you like: zucchini, cauliflower, potato, mushroom, bell peppers, etc.
  • chopped fresh coriander (cilantro)
  • dahi (plain yogurt)

Place the poha in a strainer. Pour distilled water over it to wash and moisten it. Allow to sit for 5 minutes until it is puffy. Sprinkle more water on if necessary. Do not overstir or overmoisten, as you want to keep the shape of the poha. Set aside.

In a skillet over medium-high, heat the mustard and coconut oil. When hot, add the mustard seeds and allow to crackle for a few seconds. Add the cumin seed and sputter for a few more seconds. When the ambrosia smell comes up, add the curry leaves, onion and then the garlic, and ginger. When this is translucent and golden, add the rest of the spices and the chopped veggies. Reduce heat and sauté until the veggies are tender. I like to add the tomatoes in last to retain their fresh, juicy nature.

Now add the moistened, puffed up poha. cook a couple minutes longer, gently stirring to mix while not destroying the poha. If it is too dry seeming, sprinkle a SMALL amount of water and gently mix. Salt to taste. The poha should be golden yellow, speckled with mustard seed and vegetables.

To serve: garnish with a small handful of chopped cilantro and a dollop of fresh yogurt.


Wednesday, June 13, 2012

fingerling potato salad, turkish style


Today, I had a lovely, relaxing day. I accidentally stumbled into the Goleta farmer's market this morning, on our last day here on this visit. In addition to some stellar stone fruits and strawberries, I picked up a couple pounds of fingerling potatoes, dreaming of a bright, flavorful Turkish style potato salad featuring olive oil, lemon juice and fresh parsley.


Before I started my cooking spree, however, I took another long walk through the butterfly sanctuary up the road, out to a breezy bluff overlooking a clear ocean with oodles of seaweed traipsing through the waves. It was idyllic.


Then, I came back, polished up the mosaic one last time and got cracking in the kitchen. One coconut-strawberry tart and one delicious potato salad later, I sit here and write before we begin the 4 hour journey home.

Enjoy this fresh, bright, tasty salad. It tastes like summer.


fingerling potato salad, turkish style

  • 2-3 lbs fingerling potatoes
  • 1/2 onion, thinly sliced
  • 6 cloves garlic, chopped
  • 1/2 cup parsley, chopped fine
  • 1 large tomato, seeds removed and chopped
  • Juice of one lemon
  • 4 TBS olive oil
  • 2 TBS apple cider vinegar
  • 1 tsp herbes de provence
  • 1 tsp salt
  • fresh black pepper
  • cayenne pepper

Boil the potatoes whole, until al dente, then drain and let cool. Saute the onions and garlic in a pan with a little oil to soften. When the potatoes are cool to the touch, slice in quarters or bite sized pieces. Add the parsley, tomato, garlic, onion to the potatoes in a large bowl. Whisk together the lemon juice, olive oil, vinegar, herbes de provence, salt, black pepper and cayenne pepper and add to the potatoes. Season to taste with more salt and fresh black pepper. Let sit for a while for the flavors to mingle. Serve at room temperature or chilled.

Tuesday, May 15, 2012

lemon rice with beet curry


This is a tasty combination we enjoyed recently, when I had a fridge drawer full of beets and a hankering for an aromatic, flavored rice dish. Remembering that lemons and beets pair nicely, I decided it would be worth a try.

It was, combining complex flavors in a simple recipe. You've gotta love those Indian spices. Paired with tangy yogurt and fresh cilantro, this dish is a no-brainer.

Healthy choices always at the forefront, I used brown basmati, which also loaned a nutty element to the dish. I was inspired by this beet recipe, which adds besan (chickpea flour) to the recipe before serving. This adds nutritional value, flavor and texture to the curry. Yum!


lemon rice
  • 2 cups brown basmati rice
  • 4 cups water
Cook the rice in a rice cooker or on the stove. You want a dry, fluffy rice rather than a sticky rice. Set aside.
  • 1 lemon, zested and juiced
  • 1 tsp mustard seeds
  • 1 tsp black lentils
  • 1-2 hot green chillies (Indian, serrano or jalapeno), minced
  • 1/2 tsp turmeric powder
  • 1/4 tsp asafoetida (if you've got it)
  • 4-5 curry leaves or 1 bay leaf
  • 1 TBS grapeseed oil or other cooking oil
  • salt to taste

In a large wok, heat the oil. Add the mustard seeds and wait for them to begin popping. Then add the chillies, lentils, asafoetida, curry leaves and turmeric. Fry for a minute longer to release the aromatics of the spices, and then add the rice, lemon juice, lemon zest. Stir to combine, salt to taste.

besan-beet curry
  • 6-8 beets, boiled or roasted and then peeled and chopped into bite-sized pieces
  • 1 onion, chopped
  • 1 TBS garlic paste or 4 cloves garlic, minced
  • 1/2 cup besan (chickpea flour)
  • 1 TBS mustard seeds
  • 1 tsp cumin seeds
  • 1-2 hot green chillies (Indian, serrano or jalapeno)
  • 1/2 tsp turmeric
  • salt to taste
  • Oil for cooking
  • Plain yogurt & chopped fresh cilantro (coriander)

In a large wok, heat the oil. Add the mustard and cumin seeds and allow them to brown and begin popping. Add the onion, turmeric and hot peppers. Then add the beets and stir will. Add the besan, sprinkle with a couple of tablespoons water and continue cooking and stirring until the raw flavor of the besan goes away. Salt to taste.

For a groovy dome-shaped service, choose a round bowl of your preferred serving size. Fill the bottom third with beet curry and the rest with lemon rice. Press down firmly, put a small plate on top and flip over. Carefully remove the bowl, and top with plain yogurt and chopped cilantro. Bon appétit!

Sunday, May 6, 2012

playing with idli


One of my first posts on the veggie voyager was for a South Indian staple called idli. I have since mentioned idli multiple times, as it is a traditionally gluten free food that is easy to digest and a tasty vehicle for sauces, chutneys and other delicious dishes (usually Indian, I suppose).

A few months ago I invested in an idli steaming pan from our local Indian grocery store. For a while there I was buying premade idli batter, which is sold in plastic tubs. It is an easy, convenient way to have fresh idli at home, but I was curious about learning to make this dish from scratch.


I have since learned that the process is very easy, as long as you think ahead. All you have to do is soak lentils, rice and fenugreek seeds (separately), blend them (separately), combine, and leave overnight to ferment. The resulting bubbly goodness is a tangy batter that can be spooned into the idli pan and steamed up. Idli are tangy, spongy and delicious.


left to right: rice, quinoa, green lentils & chickpeas;
black rice & brown lentils;
brown rice & urud dahl

The other good news is that this batter, if thinned a little bit with water, can be used to make dosa as well, which you all know is a food I love very much. Dosa are a little more difficult to perfect though, as I especially like mine to be paper thin and dry, and the dosa I've made at home so far are more spongy  than I like. I am working on it though...


the three batters:soaked, blended and ready to ferment.

Because we like to experiment, we decided to try idli using different types of lentils and pulses. Our three experiments were: brown basmati rice and urud dahl (almost a standard, traditional idli), brown basmati and quinoa with green lentils and green chickpeas, and for the third, black rice and dark brown lentils. To the green version we also added spirulina powder and cilantro. The black rice batter got the addition of fresh ginger. After blending, this one morphed into deep purple.

Each was good. The green ones and the white ones won the contest, although we might not add spirulina again. I liked the purple idli but Ryan was not a fan. Our guests really enjoyed the novelty of the different colors and flavors. The traditional, white batter made the best dosa, followed by the green. As dosa, the purple batter was not quite as successful.


I am a firm believer in the wonders of traditional dishes that happen to be gluten free by virtue of their very existence. One does not need to settle for icky, stiff store-bought GF bread or $15 frozen GF pizzas when there are recipes out there that need no xanthan gum or tapioca starch to make them work for you. The fact that these are fermented is an added bonus: fermentation makes food more easily digestible, nutritious and in my humble opinion, better tasting.

If you'd like to experiment, the proportions remain the same, but the types of beans and grains change. All have fenugreek, which is a common Indian spice. Have fun...be wild! If you don't already have one, I hope you will add an idli steamer to your kitchen collection, it's fun to play with...

We invited friends over and enjoyed our idli (and dosa, and rice) with chana masala (chickpeas), baingan bharta (eggplant), aloo gobi (potatoes and cauliflower), mango chutney, cilantro chutney, tamarind chutney, and dahi (Indian yogurt). It was a feast fit for royalty. The chana masala was off the hook. I followed the linked recipe to the tee. I highly recommend that you try it.


Idli

  • 3 cups rice, or combination of rice and quinoa (brown rice, black rice, red rice, etc all should work)
  • 1 cup dahl or lentils (urud dahl is traditional, but depending on color and flavor you can experiment here)
  • 1 tsp fenugreek seeds

Put the rice in one bowl, the dahl and fenugreek seeds in another, cover each with water. Soak overnight or for 6-10 hours. Next day, blend the dahl with a small amount of the soaking water until it is smooth, like shampoo. Transfer to a large bowl. Blend the rice up until it is also quite smooth (but not completely) and add it to the dahl mixture. Stir, cover with a towel and leave to ferment overnight. 

In the morning, the batter should be bubbly and tangy smelling. Stir to combine (it will have separated) and place in the fridge until you are ready to use.

Using a paper towel dipped in oil, lightly oil each idli tray. Fill the compartments, stack the tray and place in a large pot with a lid, with about 1 inch of water in the bottom. Cover and steam for 15-20 minutes, or until the centers of the idli are firmed up. Turn off the heat and allow the idli to sit for 20 minutes or so before using a rubber spatula to scoop each idli out of the tray. Arrange on a plate and serve with sambar, chutney or other sauce.

Friday, May 4, 2012

D-K-Che' in Imperial Beach


You know how sometimes you find yourself in a neighborhood that doesn't have a lot of veggie options, so you start thinking, "how bad is a little lard in my beans, really?", or, "just one donut isn't going to kill me..."?

Well, Imperial Beach in south San Diego can be that place. So I'd like to shout out to the ladies that run the new smoothie, torta and juice joint just up the road from Home Depot on Palm Avenue. Clean, friendly, fresh and a nice option for a refreshing pick-me-up.


We had the green juice, with fresh pineapple, celery, parsley, grapefruit, nopales, spinach and orange juices all in one glass. We also enjoyed tostilocos minus the cueritos (pork skin). This snack is a hodge podge of jicama, pepino, chaka chaka (?), cacahuate (peanuts), tajin (one of my mom's favorites), lemon, chile, and chamoy. It was cruncy, salty, tangy and spicy. There were salty round corn chips tucked throughout the mix as well.

Here is the pertinent info, so that next time you find yourself in IB, you know where to duck in to!

D-K-Che'

1555 Palm Avenue, San Diego, CA 92154
(619) 651 - 8595
8 am to 10 pm

Located at the corner of 16th and Palm Avenue, just west of the I-5 freeway.

Wednesday, May 2, 2012

gluten free chia-flax-rice roti


While in India, every time I had a wheat based dish I'd start thinking about how when I got back to San Diego that I'd make a gluten free version of whatever I was eating. I had all kinds of ideas. I still do, so stay tuned for veggie voyager versions of all kinds of stuff.


This is my first contribution to the GF Indian flatbread family, and certainly not the last. I am looking forward to trying some Tibetan steamed bread recipes in the near future.

Chapatti and Roti are unleavened flatbreads traditionally made using whole wheat flour and cooked on a flat skillet called a tava. In some parts of India, hardly a meal is eaten without chapatti or roti.


We are staying with dear family/friends in Goleta, CA, just north of Santa Barbara. We are here to visit, to see Steve Martin play his banjo, plan another mosaic project, and eat good, healthy food.

of course, being californian, some of us did it taco style...

When I planned to make this meal, I didn't even realize that I was making a GF version of Camel Safari Masala, until Ryan pointed it out to me. I made a masala with brussels sprouts, black eyed peas, and cauliflower florets. It was tasty alongside cilantro chutney, raw mango chutney and fresh plain yogurt.

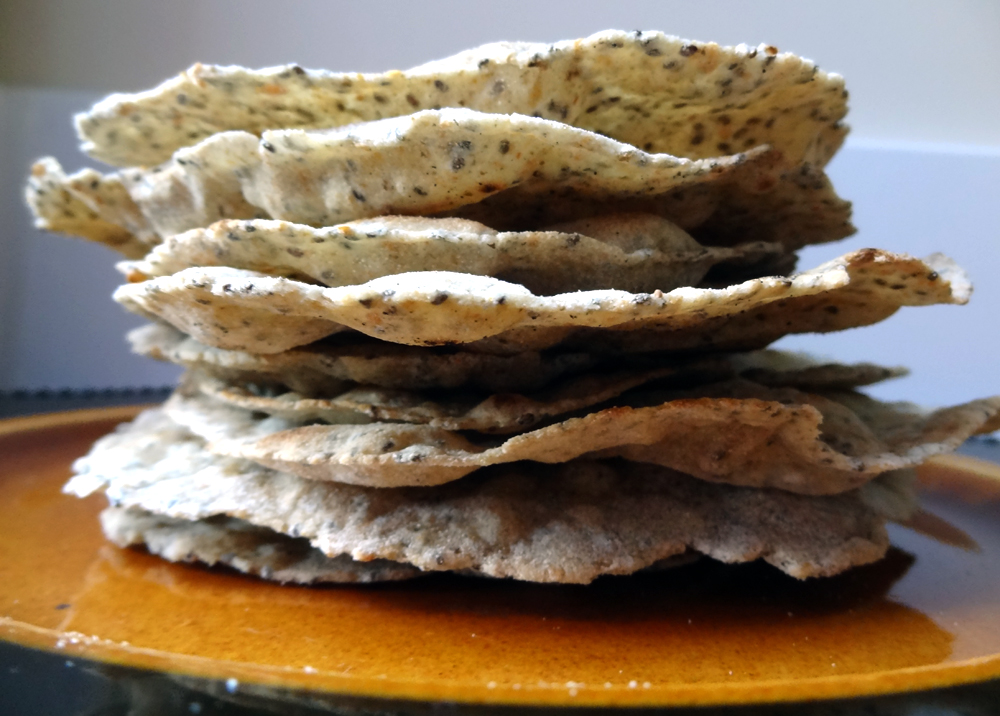
These flatbreads are a slightly pliable but not quite as soft as wheat based chapatti or roti (which are basically the same thing). The rice flour results in a slightly drier, crispier bread that is less heavy than its wheat-based relative. They are speckled throughout with chia seeds. They are perfect for conveying morsels of the masala over to the mouth region. I did not use a recipe per-say, but I will walk you through the process so you can enjoy them at home.


GF Chia-Flax-Rice Roti

  • 2 TBS chia seeds
  • 1/2 cup flax meal
  • 2 TBS oil of your choice (I used olive)
  • 2-3 cups rice flour (I like brown rice flour)
  • 1 tsp salt
  • 1/4 cup of water or so

Combine the chia seeds, flax meal, oil, salt and water. Add one cup of rice flour and mix. Continue mixing and adding rice flour a little bit at a time until the dough forms a ball. Knead the dough as you would a wheat dough, adding small amounts of rice flour to prevent it from getting sticky. When the dough is elastic and smooth, create a log that is about 1 1/2 inches in diameter and 1 foot long. Cut this log into sections that are about 1 inch wide. Using your fingers, press each section into a flattened disk. Dust each side with rice flour and roll out using a rolling pin on a flour dusted surface until you have a thin, round sheet, not unlike a tortilla. Heat a skillet and rub with a small amount of oil. In India, they take a half potato or onion, stab it with a fork, dip the flat side into oil and use that to oil the pan. You don't need much oil if any at all for this, just an initial amount to help start the process. When the pan is hot, add one roti and cook until it begins to blister. Flip and continue cooking until it is cooked to your liking. Set aside and continue with the rest until you have a delicious stack of crispy roti. Enjoy with masala, curry or chutney.
ready for rolling out.